
The complications of the ML infrastructure management continue and spread in growth and can be already arduous. Some time ago, we participated. “Step Step Directory to prepare MNFlow on the Google Cloud platform,“Whenever received well. However, over time, progress in technology provided us with the ability to simplify this process and make more automation.
This is where Terraform plays. As a powerful infrastructure tool such as IC Code, Terraform enables automation, which greatly simplifies the ML infrastructure management.
In this step -by -step guide, we will clarify how to prepare MNFlow smoothly on the Google Cloud platform using Terraform, increase the improvement of the process, integrate additional automation, and expand the infrastructure of machine learning.
Whether you are already benefiting from the MLFlow capabilities to improve automatic learning experiences or just starting to move in its potential, this guide will provide a step -by -step tutorial to increase your work.
What is Terraform?
Before going into the details of the TerraForm use of our ML infrastructure management, let’s start with an explanation of the Terraform.
Terraform is an open source anxious infrastructure as the IAC code created by Hashicorp. The developers are allowed to determine and provide the infrastructure of the data center using the identification language language. You only need to express the country required for infrastructure, and the strategic Terraform to achieve this situation.
This possibility is especially useful in our focus: MNFlow setting on the Google Cloud platform. It is automated and managed.
Moreover, the independent nature of the platform of Terraform allows work with any cloud provider, ensuring its benefit in managing resources through various environments.
5 The main advantages of Terraform
In any technology -dependent process, the selection of tools is a major specificity for efficiency and success. After a comprehensive evaluation of a wide range of options, we concluded that Terraform is already highlighting. But what exactly prompted us towards Terraform? Let’s check the specific benefits provided by this tool:
- Code reuse: The TerraForm icon can be reused effortlessly for future needs, which simplifies your business operations.
- Accountability: The code can be easily reviewed, which enhances transparency and facilitate errors detection and problem solving.
- Simplified management: The unique infrastructure approach as IC Code eliminates complex manual processes, which makes the infrastructure management much easier.
- Low savings: Terraform speeds up the preparation process, allowing publication faster and increasing total productivity.
- Easier Drink Management: With terraform, deviations from the required infrastructure status can be detected and easily correct, which simplifies the complex task often of managing drift.
Link to the warehouse
For your convenience and reference, we have prepared a dedicated warehouse that includes all the necessary resources related to this guide.
If you encounter any problems or request an additional clarity, we recommend Using this warehouse.
resources
- LEDSQL Database
- bucket – Storing the artifacts MLFlow
- Score – Maintain a Docker image
- Secret manager – Save passwords
- Cloudrun – Mlaflow container operation
- Service accounts To reduce concessions
13 main steps to prepare MLFlow on the Google Cloud platform using TerraForm
Step 1: Preparation Terraform
- Terraform Install – Link to official documents
- TerraForm-docs for automatic documentation (optional) Terraform-docs
Step 2: Activating the necessary application programming facades
To start this project, it is necessary to activate the following application programming facades. Please note that the activation process for each other may take up to 24 hours.
Step 3: GCP preparation
- GCLoud Cli Install: https://cloud.google.com/sdk/docs/install
- Log in to GCLOOD using GCLOUD Auth Defialt Login
Step 4: Create a bucket for Terraform
A bucket must be created to store the Terraform condition. Although it is possible to maintain the situation locally, it is not recommended due to potential problems with data integration and reliability.
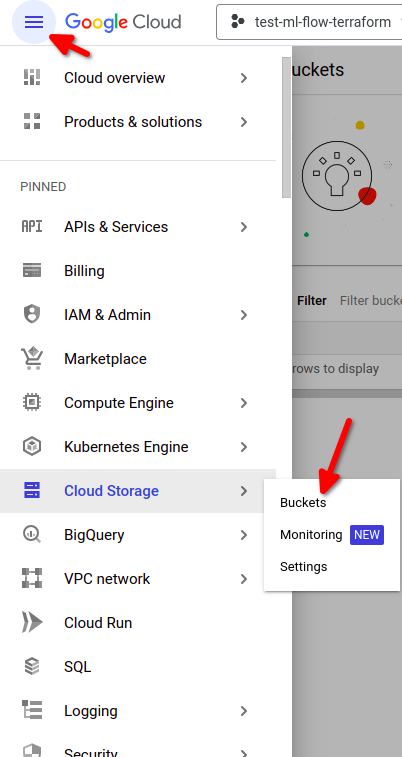
- From the Google Cloud menu, choose Cloud Storage -> Aquarius -> Create a bucket
 And then:
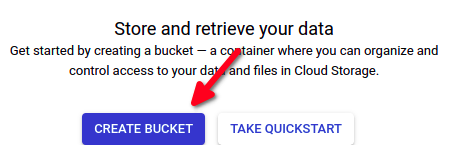
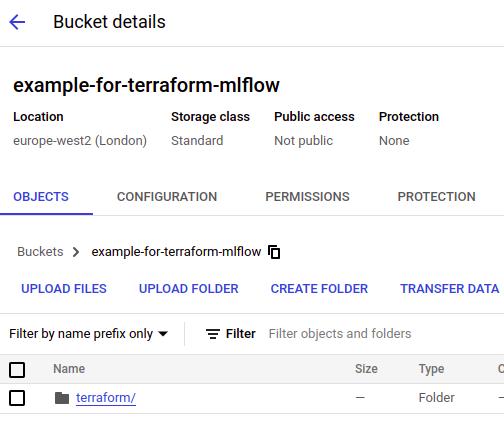
- Fill in the bulldozer data (on the screen, you can see the data form). Think about choosing “Multiregion type” if your project needs higher availability. You can adjust other options as required.

Step 5: Start working with Terraform
If you need more detailed information about specific resources, Terraform documents work as an excellent resource.
- Create a main.tf file, which will maintain the basic configuration. Make sure to include the latest version of the AWS provider.
terraform { required_providers { google = { source = "hashicorp/google" version = "4.58.0" } } backend "gcs" { bucket = "your bucket name" prefix = "terraform/state" } } provider "google" { region = "your region" project = "your project name" } - Go to your TerraForm guide and write Terraform. This will create Terraform, download all wanted service providers, and create a connection with your state bucket.
You should see a directing similar to the following:/projects/mlflow-gcp/terraform$ terraform init Initializing the backend... Successfully configured the backend "gcs"! Terraform will automatically use this backend unless the backend configuration changes. Initializing provider plugins... - Finding hashicorp/google versions matching "4.58.0"... - Finding latest version of hashicorp/random... - Installing hashicorp/google v4.58.0... - Installed hashicorp/google v4.58.0 (signed by HashiCorp) - Installing hashicorp/random v3.5.1... - Installed hashicorp/random v3.5.1 (signed by HashiCorp) Terraform has created a lock file .terraform.lock.hcl to record the provider selections it made above. Include this file in your version control repository so that Terraform can guarantee to make the same selections by default when you run "terraform init" in the future. - You should now be able to see the Terraform folder in your Duttak:
Step 6: Entering variables for the project
Before we can start creating resources, we must enter the specific project variables. These must be created in the variable file.
- ENV – Depending on the place where the test/PROD test will be used.
variable "env" { default = "prod" description = "Name of the environment" } - The full name of the project can be found here:
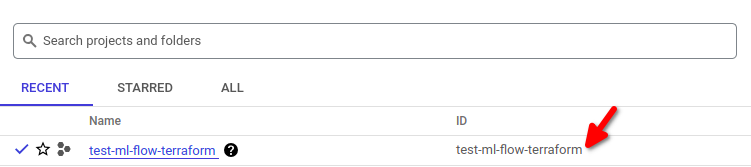
variable "project_name" { default = "test-ml-flow-terraform" description = "Full name of the project" } - VPN for the database – If you use VPN, it will be good to enter it into this variable because it adds an additional layer of safety.
variable "vpn_to_access_db" { default = "0.0.0.0/0" description = "VPN that will be used to connect to DB, while using 0.0.0.0/0 the application will be available from any IP (it will be accessible from the internet)." } - The area that will be used during your project.
variable "region" { default = "europe-west2" description = "GCP region that will be used for the project" } - Docker’s image – after pushing your photo to the container record, you must put the link to the image here.
variable "image_name" { default = "mlflow-imagine" description = "Name of the imagine that will be used." } - Aquarius menu – enter all users who need to be able to see objects in the Aquarius. You need to put a “user:” before email if email belongs to a user, and “Serviceaccount:” If he belongs to a service account.
variable "bucket_users_list" {
  default     = ["user:user_email2@gmail.com", "user:user_email2@gmail.com"]
  description = "List of users "
}
Step 7: Create an artifact registration file
Create a record using Terraform. For this purpose, you will need to create a file entitled Artifact_registry.tf:
resource "google_artifact_registry_repository" "ar_mlflow" {
  location      = var.region
  repository_id = "${var.project_name}-repo"
  description   = "Docker repository for MlFlow"
  format        = "DOCKER"
}
Create a warehouse, using the order:
terraform apply -target="google_artifact_registry_repository.ar_mlflow
To use it to rotate the post *cloud *, you need to create a Docker image, and put it on the Artifact *.
Make sure to install a modern version of Docker. You can follow the installation instructions from Official Docker documents.
Docker’s photos are set to be pushed to the artifact record in your GCP project.
You need to change the project and the area in the orders you use. If you have any problems with the artifact record, let, see Official documents
Make sure to change the project and the region’s identifier in order to match the events you use. If you encounter any problems with the artifact record, please refer to official documents.
To prepare Docker, you just need to do this once:
Setting * Docker * Auth once:
gcloud auth configure-docker europe-west2-docker.pkg.dev
Imagine construction:
docker build -t mlflow-gcp .
The mark:
docker tag mlflow-gcp europe-west2-docker.pkg.dev/test-ml-flow-terraform/test-ml-flow-terraform-repo/mlflow-imagine:latest
Pay:
docker push europe-west2-docker.pkg.dev/test-ml-flow-terraform/test-ml-flow-terraform-repo/mlflow-imagine:latest
Step 8: Create an example of a database
- First, we need to create an assembly that will hold our database (you must create a new .TF file for the database).
-
- The version used is PostGRESQL 14 (The latest currently available), the minimum configuration of this version is 1 CPU and 3.75 GB RAM, so a customized layer must be created (Read more about creating custom levels here).
- The counterpart needs to get some IP, so either use IPv4_enabled or create a private network if this is a better option for you.
data "google_project" "project" {
  project_id = var.project_name
}

resource "google_sql_database_instance" "main" {
  name             = "${var.project_name}-${var.env}-db"
  database_version = "POSTGRES_14"
  project          = var.project_name

  settings {
    tier            = "db-custom-1-3840" # vCPUs: 1 Memory: 3.75 GB
    disk_size       = "10"               # HDD storage: 10 GB
    disk_type       = "PD_HDD"
    disk_autoresize = false
    ip_configuration {
      ipv4_enabled  = true
      authorized_networks {
        name  = "Your VPN"
        value = var.vpn_to_access_db
      }
    }
  }
}
Use Terraform Plan. If there are no problems, then implement Terraform app. Be aware that creating database counterparts may take anywhere from 5 to 20 minutes.
It should look like this:

-
- Once the counterpart is finished and ready, we can create a database. You will comment on the counterpart we have previously created.
resource "google_sql_database" "ml_flow_db" { name = "mlflow-${var.project_name}-${var.env}" instance = google_sql_database_instance.main.name project = var.project_name } - The next step is to create a user. The password is created using Random_Password Resource to create random symbols for you. The login address, password, and URL for the database are added to the secrets, where it will be needed later.
resource "google_sql_user" "ml_flow_user" {
  name     = "mlflow-${var.project_name}-${var.env}"
  instance = google_sql_database_instance.main.name
  password = random_password.db_password_ml_flow.result
  project  = var.project_name
}
Create a secret log in:
resource "google_secret_manager_secret" "db_login_ml_flow" {
  secret_id = "mlflow_tracking_username"
  project   = var.project_name
  replication {
    automatic = true
  }
}

resource "google_secret_manager_secret_version" "ml-flow-username-version-basic" {
  secret      = google_secret_manager_secret.db_login_ml_flow.id
  secret_data = google_sql_user.ml_flow_user.name
}
Create a password with password:
resource "random_password" "db_password_ml_flow" {
  length           = 16
  special          = true
  override_special = "!#$%&*()-_=+[]{}<>:?"
}

resource "google_secret_manager_secret" "db_password_ml_flow" {
  secret_id = "mlflow_tracking_password"
  project   = var.project_name
  replication {
    automatic = true
  }
}

resource "google_secret_manager_secret_version" "ml-flow-pass-version-basic" {
  secret      = google_secret_manager_secret.db_password_ml_flow.id
  secret_data = random_password.db_password_ml_flow.result
}
Create a secret with the database connection link that we will use later:
resource "google_secret_manager_secret" "mlflow_database_url" {
  secret_id = "mlflow_database_url"
  project   = var.project_name
  replication {
    automatic = true
  }
}

resource "google_secret_manager_secret_version" "mlflow_database_url-version-basic" {
  secret      = google_secret_manager_secret.mlflow_database_url.id
  secret_data = "postgresql+psycopg2://${google_sql_user.ml_flow_user.name}:${random_password.db_password_ml_flow.result}@/${google_sql_database.ml_flow_db.name}?host=/cloudsql/${google_sql_database_instance.main.connection_name}"
}
use Terraform Plan And then Terraform app.
Step 9: Create service accounts for Cloudrun and MLFlow
Next, we have two service accounts to create them, one with Cloudrun and the second to call MLFlow. We will set their rights in a separate file (a new .TF file for service accounts) must be created.
- For Cloudrun – it will be used only by Cloudrun:
resource "google_service_account" "cloudrun-mlflow" { account_id = "cloudrun-mlflow-${var.env}" display_name = "Service Account for Cloud Run running ML Flow" } - To contact MLFlow and create objects in a bucket, you will need the key to connect to MNFlow using a text program.
resource "google_service_account" "bucket_object_creator" {
  account_id   = "mlflow-connect-${var.env}"
  display_name = "Service Account for create objects in ML Flow bucket."
}

resource "google_service_account_key" "key_to_bucket_object_creator" {
  service_account_id = google_service_account.bucket_object_creator.name
}

resource "google_secret_manager_secret" "bucket_object_creator_account_key" {
  secret_id = "mlflow_service_account_key"
  project   = var.project_name
  replication {
    automatic = true
  }
}

resource "google_secret_manager_secret_version" "mlflow_key-version-basic" {
  secret      = google_secret_manager_secret.bucket_object_creator_account_key.id
  secret_data = base64decode(google_service_account_key.key_to_bucket_object_creator.private_key)
}
after Terraform Plan and Terraform appYou should be able to see two accounts of the new service; One must have a key.

Step 10: Create a storage bucket for MNFlow artifacts
At this stage, we will create a storage bucket for our MNFlow artifacts, the bucket is created as regional, but if you need higher availability, you can use other types (you must create a new .f file for the bucket).
resource "google_storage_bucket" "mlflow_artifacts_bucket" {
  name                        = "${var.project_name}-mlflow-${var.env}-${var.region}"
  project                     = var.project_name
  location                    = "EUROPE-WEST2"
  storage_class               = "REGIONAL"
  uniform_bucket_level_access = true
  public_access_prevention    = "enforced"
  force_destroy               = false
}
URL must be inserted in secret as we will need it later.
resource "google_secret_manager_secret" "mlflow_artifact_url" {
  secret_id = "mlflow_artifact_url"
  project   = var.project_name
  replication {
    automatic = true
  }
}

resource "google_secret_manager_secret_version" "ml-flow-artifact-url-version-basic" {
  secret      = google_secret_manager_secret.mlflow_artifact_url.id
  secret_data = google_storage_bucket.mlflow_artifacts_bucket.url
}
Step 11: IAM formation
- Add rights to the recognition (pre -created) account to be able to contact the database (the new IAM file must be created.
resource "google_project_iam_member" "cloudsql_connect" { project = var.project_name role = "roles/cloudsql.client" member = "serviceAccount:${google_service_account.cloudrun-mlflow.email}" } - Add rights to the Cloudrun service account, so that he can read the secrets.
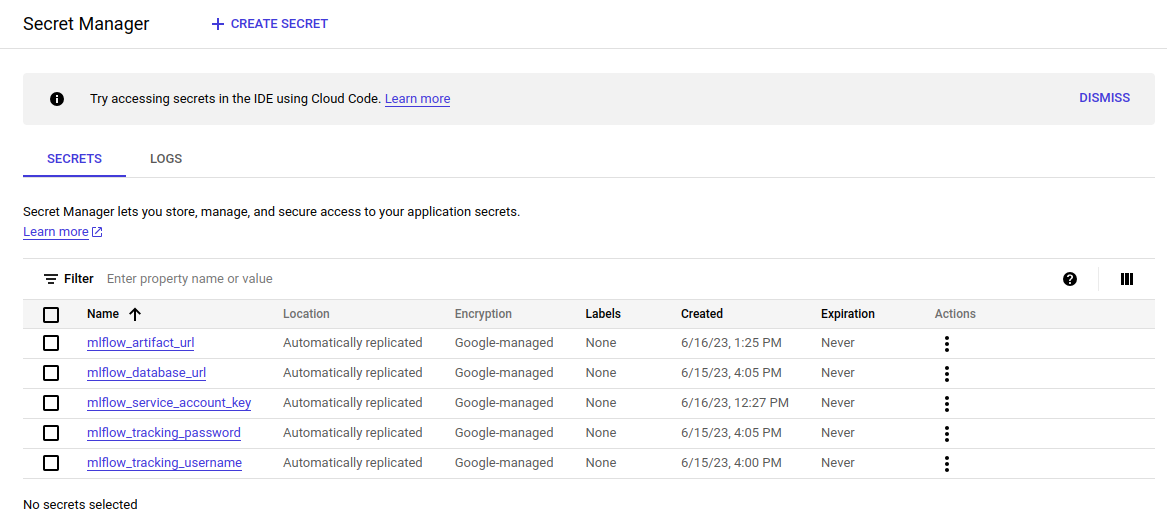
resource "google_secret_manager_secret_iam_member" "db_login_ml_flow_accessor" {
  secret_id = google_secret_manager_secret.db_login_ml_flow.id
  role      = "roles/secretmanager.secretAccessor"
  member    = "serviceAccount:${google_service_account.cloudrun-mlflow.email}"
}

resource "google_secret_manager_secret_iam_member" "db_password_ml_flow_accessor" {
  secret_id = google_secret_manager_secret.db_password_ml_flow.id
  role      = "roles/secretmanager.secretAccessor"
  member    = "serviceAccount:${google_service_account.cloudrun-mlflow.email}"
}

resource "google_secret_manager_secret_iam_member" "mlflow_artifact_url_accessor" {
  secret_id = google_secret_manager_secret.mlflow_artifact_url.id
  role      = "roles/secretmanager.secretAccessor"
  member    = "serviceAccount:${google_service_account.cloudrun-mlflow.email}"
}

resource "google_secret_manager_secret_iam_member" "mlflow_database_url_accessor" {
  secret_id = google_secret_manager_secret.mlflow_database_url.id
  role      = "roles/secretmanager.secretAccessor"
  member    = "serviceAccount:${google_service_account.cloudrun-mlflow.email}"
}
All secrets should look like this:
- Create a bucket for a bucket so that your team can take a look at the objects, and to make a service account to create objects.
data "google_iam_policy" "mlflow-bucket-policy" {
binding {
role = "roles/storage.objectViewer"
members = concat(var.bucket_users_list, ["serviceAccount:${google_service_account.cloudrun-mlflow.email}"])
}
binding {
role = "roles/storage.objectCreator"
members = [
"serviceAccount:${google_service_account.bucket_object_creator.email}",
]
}
}
resource "google_storage_bucket_iam_policy" "policy_bucket_object_create" {
bucket = google_storage_bucket.mlflow_artifacts_bucket.name
policy_data = data.google_iam_policy.mlflow-bucket-policy.policy_data
depends_on = [google_service_account.cloudrun-mlflow, google_storage_bucket.mlflow_artifacts_bucket]
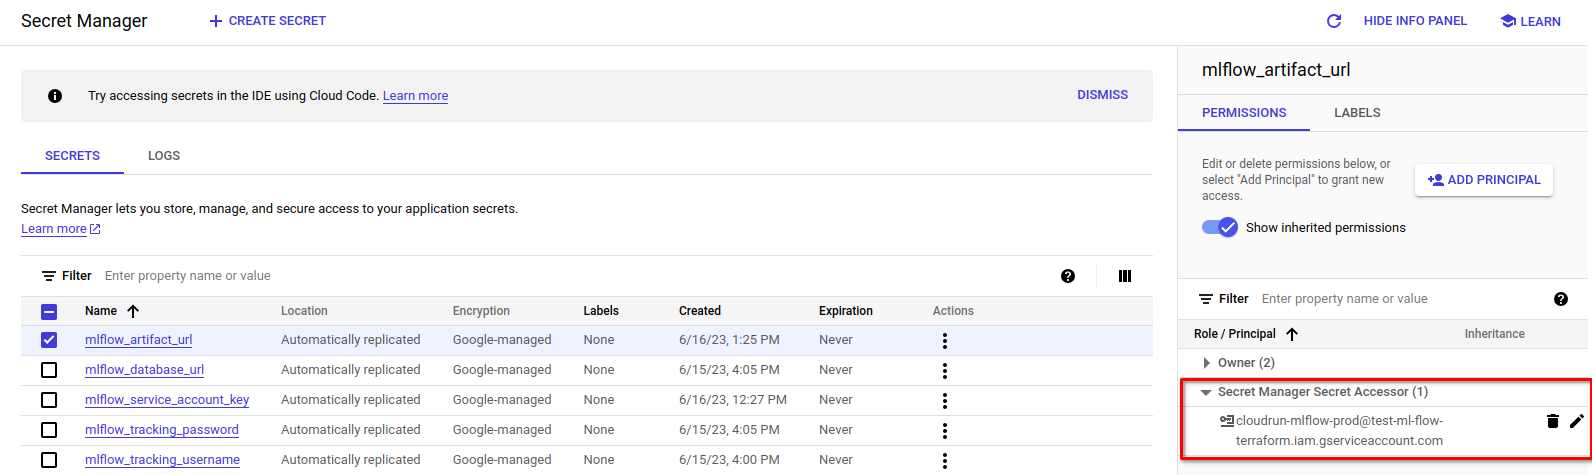
}You should be able to see these permissions in the bucket:
Step 12: Access to the Secret Director
If everything is done correctly, you should see this:
Step 13: Forming the operation of the cloud
This resource will be the most complex ever. Below is the full resource (you must create a new .TF file for Cloud Run):
- Service_account – The service account that Terraform will use
- Template/sizes – Cloudrun tells that he needs to contact the database
- Template/containers – carries information about what the container should be used; You can also advertise Env values for the container here:
data "google_project" "project" {
  project_id = var.project_name
}

resource "google_cloud_run_v2_service" "mlflow_on_cloudrun" {
  name     = "mlflow-${var.project_name}-${var.env}"
  location = var.region
  ingress  = "INGRESS_TRAFFIC_ALL"
  client   = "cloud-console"

  depends_on = [google_service_account.cloudrun-mlflow, google_artifact_registry_repository.ar_mlflow]

  template {
    service_account = google_service_account.cloudrun-mlflow.email
    volumes {
      name = "cloudsql"

      cloud_sql_instance {
        instances = [
          google_sql_database_instance.main.connection_name,
        ]
      }
    }
    scaling {
      max_instance_count = 10
    }
    containers {
      image = "${var.region}-docker.pkg.dev/${var.project_name}/${google_artifact_registry_repository.ar_mlflow.name}/${var.image_name}:latest"
      env {
        name  = "GCP_PROJECT"
        value = data.google_project.project.number
      }
      volume_mounts {
        mount_path = "/cloudsql"
        name       = "cloudsql"
      }

      resources {
        cpu_idle = true
        limits = {
          cpu    = "1000m" # 1 vCPU
          memory = "1024Mi"
        }
      }
    }
  }
}
This part of the symbol allows everyone access to the link to the MLFlow, which is then secured by logging in and password.
resource "google_cloud_run_service_iam_binding" "access_to_mlflow" {
  location = google_cloud_run_v2_service.mlflow_on_cloudrun.location
  service  = google_cloud_run_v2_service.mlflow_on_cloudrun.name
  role     = "roles/run.invoker"
  members = [
    "allUsers"
  ]
}
If you are planning to download sensitive data to MLFlow, I suggest adding another safety layer.
conclusion
However, we got to the end of this guide. I hope you have found this insightful and useful tutorial.
As you can see, the MNFlow setting on the GCP using Terraform leads to enhancing automation and simplifying ML. But Terraform provides more than just automation-as it provides major benefits such as the code reuse, simplified management, and reduce savings time, all of which are vibrant in a fast-paced ML environment.
With automatic learning progress, staying up and adapting to emerging trends and techniques is very important. If you find this guide useful, think about subscribing to our newsletter. We plan to publish more educational programs that can greatly enhance your business efficiency.
Fill in the bulldozer data (on the screen, you can see the data form). Think about choosing “Multiregion type” if your project needs higher availability. You can adjust other options as required.